
前回、ざっくりと紙芝居を作ったのですが、さらにファビュラスなものにするため、手直ししていきます。
目次
ボタンとウインドウの調整
ボタンとテキスト表示用ウインドウを次のように改善したいんですよね。
- 最初の画面の「もどる」ボタンは不要なので非表示にしたい。
- 最後の画面の「つぎへ」ボタンも不要なので非表示にしたい。代わりに「最初にもどる」ボタンを表示したい。
- 最初の画面のテキスト表示用ウインドウは不要なので非表示にしたい。
で、スクリプトを次のように修正しました。
using System.Collections;
using System.Collections.Generic;
using UnityEngine;
using UnityEngine.UI; // UI用の名前空間
using TMPro; // TextMesh Pro用の名前空間

public class GameController : MonoBehaviour
{
    public Image displayImage; // 画像表示
    public TextMeshProUGUI displayText; // テキスト表示
    public Button nextButton; // つぎへボタン
    public Button backButton; // もどるボタン
    public TextMeshProUGUI nextButtonText; // つぎへボタンのテキスト
    public GameObject displayWindow; //テキスト表示ウインドウ
    public Sprite[] images; // 画像の配列
    public string[] texts; // テキストの配列

    private int currentIndex = 0; // 現在表示している画像とテキストのインデックス
    private RectTransform nextButtonRectTransform; //次へボタンのRectTransform

    // Start is called before the first frame update
    void Start()
    {
        nextButtonRectTransform = nextButton.GetComponent<RectTransform>(); // 次へボタンのRectTransformコンポーネントを取得

        UpdateDisplay(); // 表示を更新
        nextButton.onClick.AddListener(NextImage); // つぎへボタンのクリックイベントを登録
        backButton.onClick.AddListener(PreviousImage); // もどるボタンのクリックイベントを登録
        UpdateButtonVisibility(); // ボタンの表示/非表示を更新
    }

    void NextImage()
    {
        if (currentIndex < images.Length - 1) // 最後の画像でない場合
        {
            currentIndex++; // インデックスを進める
        }
        else //最後の画像の場合
        {
            currentIndex = 0; // インデックスを0にする
        }
        UpdateDisplay(); // 表示を更新
        UpdateButtonVisibility(); // ボタンの表示/非表示を更新
    }

    void PreviousImage()
    {
        if (currentIndex > 0) // 最初の画像でない場合
        {
            currentIndex--; // インデックスを戻す
        }
        UpdateDisplay(); // 表示を更新
        UpdateButtonVisibility(); // ボタンの表示/非表示を更新
    }

    void UpdateDisplay()
    {
        displayImage.sprite = images[currentIndex]; // 現在の画像を表示
        displayText.text = texts[currentIndex]; // 現在のテキストを表示

        // displayTextが空の場合、displayWindowを非表示にする
        if (string.IsNullOrEmpty(displayText.text))
        {
            displayWindow.SetActive(false);
        }
        else
        {
            displayWindow.SetActive(true);
        }

    }

    void UpdateButtonVisibility()
    {
        if (currentIndex == 0)
        {
            backButton.gameObject.SetActive(false); // 最初の画像でもどるボタンを非表示
        }
        else
        {
            backButton.gameObject.SetActive(true); // それ以外ならばもどるボタンを表示
        }

        if (currentIndex == images.Length - 1)
        {
            nextButtonText.text = "最初にもどる"; // 最後の画像で次へボタンのテキストを変更
            nextButtonRectTransform.sizeDelta = new Vector2(160, 30); // サイズを大きくする
        }
        else
        {
            nextButtonText.text = "つぎへ"; // それ以外ならばボタンのテキストを戻す
            nextButtonRectTransform.sizeDelta = new Vector2(80, 30); // サイズを元に戻す
        }
    }
}
追加した処理は次のとおり。
NextImage()メソッドに最後の画面の場合の処理を追加。PreviousImage()メソッドに最初の画面の場合の処理を追加。UpdateDisplay()メソッドにテキストが空のときにウインドウを非表示にする処理を追加。- ボタンの表示/非表示を制御するメソッド
UpdateButtonVisibility()を追加。- 最初の画面ならばbackButtonを非表示にする。
- 最後の画面ならばnextButtonのテキストを変更する。文字が収まらないのでボタンのサイズも変更する。
まあまあ長いスクリプトになったので、もうちょっと効率よく書けませんかねとChatGPT氏に相談したところ、次のようになりました。
using System.Collections;
using System.Collections.Generic;
using UnityEngine;
using UnityEngine.UI; // UI用の名前空間
using TMPro; // TextMesh Pro用の名前空間

public class GameController : MonoBehaviour
{
    public Image displayImage; // 画像表示
    public TextMeshProUGUI displayText; // テキスト表示
    public Button nextButton; // つぎへボタン
    public Button backButton; // もどるボタン
    public TextMeshProUGUI nextButtonText; // つぎへボタンのテキスト
    public GameObject displayWindow; //テキスト表示ウインドウ
    public Sprite[] images; // 画像の配列
    public string[] texts; // テキストの配列

    private int currentIndex = 0; // 現在表示している画像とテキストのインデックス
    private RectTransform nextButtonRectTransform; //次へボタンのRectTransform

    // Start is called before the first frame update
    void Start()
    {
        nextButtonRectTransform = nextButton.GetComponent<RectTransform>(); // 次へボタンのRectTransformコンポーネントを取得

        UpdateDisplay(); // 表示を更新
        nextButton.onClick.AddListener(NextImage); // つぎへボタンのクリックイベントを登録
        backButton.onClick.AddListener(PreviousImage); // もどるボタンのクリックイベントを登録
        UpdateButtonVisibility(); // ボタンの表示/非表示を更新
    }

    void NextImage()
    {
        currentIndex = (currentIndex + 1) % images.Length; // 最後の画面ならばインデックスを0に、それ以外はインデックスを進める
        UpdateDisplay(); // 表示を更新
        UpdateButtonVisibility(); // ボタンの表示/非表示を更新
    }

    void PreviousImage()
    {
        if (currentIndex > 0) // 最初の画像でない場合
        {
            currentIndex--; // インデックスを戻す
        }
        UpdateDisplay(); // 表示を更新
        UpdateButtonVisibility(); // ボタンの表示/非表示を更新
    }

    void UpdateDisplay()
    {
        displayImage.sprite = images[currentIndex]; // 現在の画像を表示
        displayText.text = texts[currentIndex]; // 現在のテキストを表示

        // displayTextが空の場合、displayWindowを非表示にする
        displayWindow.SetActive(!string.IsNullOrEmpty(displayText.text));

    }

    void UpdateButtonVisibility()
    {
        backButton.gameObject.SetActive(currentIndex > 0); // 最初の画面ならばもどるボタンを非表示

        if (currentIndex == images.Length - 1)
        {
            nextButtonText.text = "最初にもどる"; // 最後の画像で次へボタンのテキストを変更
            nextButtonRectTransform.sizeDelta = new Vector2(160, 30); // サイズを大きくする
        }
        else
        {
            nextButtonText.text = "つぎへ"; // それ以外ならばボタンのテキストを戻す
            nextButtonRectTransform.sizeDelta = new Vector2(80, 30); // サイズを元に戻す
        }
    }
}
21行も節約できました。わーい。
効率化したのは3ヶ所なんだけど、特に1個目には感動してしまいました。
これが
if (currentIndex < images.Length - 1) // 最後の画像でない場合
{
    currentIndex++; // インデックスを進める
}
else //最後の画像の場合
{
    currentIndex = 0; // インデックスを0にする
}
こうなりました。
currentIndex = (currentIndex + 1) % images.Length;%の使い方がオシャレ!自力では書けないなぁ。
BGMをつける
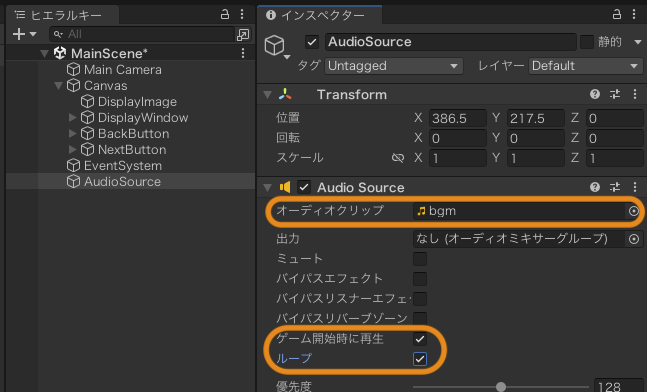
次の手順でBGMを鳴らすことができました。
- BGM用の素材 bgm.mp3 を Assets フォルダにインポート。
- ヒエラルキータブで右クリック「オーディオ > オーディオソース」を選択してオブジェクトを作成。
- オブジェクトの名前を「AudioSource」に変更。
- インスペクターの「オーディオクリップ」に bgm.mp3 を設定。
- 「ゲーム開始時に再生」をチェック(もともとチェックされてる)。
- 「ループ」をチェック。
SEをつける
ボタンをクリックしたときにSE(効果音)を鳴らしたかったので、次のようにしました。
- SE用の素材 click.mp3 を Assets フォルダにインポート。
- ヒエラルキータブでボタンオブジェクトを選択。
- インスペクターの「Button」コンポーネントの「クリック時 ()」の右下「+」をクリックしてイベントを追加。
- 「Runyime Only」はそのまま。
- 「なし(オブジェクト)」を「AudioSource」に変更。
- 「No Function」を「AudioSource > PlayOneShot」に変更。
- 「なし(オーディオクリップ)」を「click.mp3」に変更。

完成
プラットフォームをWebGLにしてビルドしてみました。音量注意。
振り返り
はじめてのUnityだったので、できるだけ簡単なものを作って成功体験を感じたいと思い制作に取り掛かりました。大成功です。1年後にはひとりでドラクエを完成させている私の姿が目に浮かびます。
でわでわ
コメント